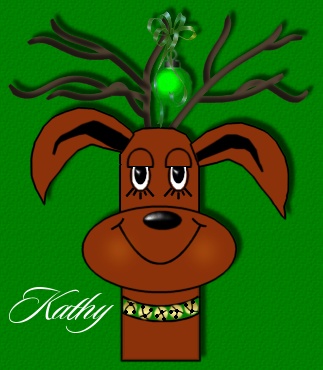
 I got the idea
for this reindeer from a tube, but I drew him myself...
You
will need my Selections below...
Reindeer Selections
Bow &
Ornament Download below
Reindeer
Tubes
Okay,,let's
get started !
1. New
Image 500 X 500...
2. Layers,
New Raster...Selections, Load from Disk, NECK.sel... Fill with
Black, selections, modify, contract by 2 and fill with #8C320A...Selections
None...
3. Layers,
New Raster...Selections, Load from Disk, SASH Outline.sel...Fill
with Black..Same Layer, Selections, Load from Disk, SASH Inside.sel,
Fill with #008000...Selections None..Same Layer, Selections,
Load from Disk, BELLS.sel...Fill with JER_Gold Gradient...Same
Layer, Selections, Load from Disk, BELL LINES.sel and fill with
black...
4. Layers,
New Raster, Selections, Load from Disk, SNOUT.sel...Fill with
Black, selections, modify, contract by 2 and fill with #8C320A...Selections
None...Same Layer,Selections, Load from Disk, MOUTH.sel and fill
with Black...
5. Layers,
New Raster, Selections, Load from Disk, NOSE.sel...You can fill
it with Red to make it look like Rudolph or you can fill with
black....Your choice ! :-) Then give it an inner
bevel using the round bevel...Layers, MERGE VISIBLE !
6. Layers,
New Raster, Selections, Load from Disk, FACE.sel...Fill with
Black, modify, contract by 2 and fill with #8C320A...Go to the
Layer Palette and drag this layer below the Merged Layer...
7. Layers,
New Raster, Selections, Load from Disk, EYELIDS.sel and fill
with black..Same Layer, Selections, Load from disk, EYE Bottom.sel
and fill with Black...Selections, Load from Disk, EYE Whites.sel
and fill with White...Selections, Load from Disk, EYES Black.sel
and fill with black...Apply the Round Inner Bevel to the Eyes...Selections,
Load from disk, EYELASHES.sel and fill with Black...
8. Layers,
New Raster, Selections, Load from Disk, EARS.sel...Fill with
Black, modify, contract by 2 and fill with #8C320A...Same Layer,
Selections, Load from Disk, EARS Inner.sel and fill with Black...Layers,
MERGE VISIBLE...
9. Layers,
New Raster, Selections, Load from Disk, ANTLERS.sel...Fill with
#514031...Now go to the Layer Palette and drag this layer under
the Merged Layer...Selections All, Selections Float, Selections
Invert, Effects, Drop Shadow and use these settings...
V -5,
H 5, Opacity 63, Blur 5, Color Black...Selections,
None...Layers, MERGE VISIBLE..
10.
Layers, New Raster, Selections, Load from Disk, ORNAMENT.sel...Open
the Ornament tube and Bow you downloaded...Copy and paste the
Ornament into Selection...Layers, MERGE VISIBLE...
11.
Layers, New Raster, Selections, Load from Disk, CHEEKS.sel...
Fill with #C06514...Effects, Blur, Gaussian Blur, Radius 5...Layers,
MERGE VISIBLE...Save in PSP format or as a JPEG...
That's it,,,He
is all done !
I sure hope
you enjoyed making this reindeer and thank you for doing the
tutorial...
Kath's Tutorial Korner
© 2000 *Kath's Tuts
& Graphic Designs* All Rights Reserved
I got the idea
for this reindeer from a tube, but I drew him myself...
You
will need my Selections below...
Reindeer Selections
Bow &
Ornament Download below
Reindeer
Tubes
Okay,,let's
get started !
1. New
Image 500 X 500...
2. Layers,
New Raster...Selections, Load from Disk, NECK.sel... Fill with
Black, selections, modify, contract by 2 and fill with #8C320A...Selections
None...
3. Layers,
New Raster...Selections, Load from Disk, SASH Outline.sel...Fill
with Black..Same Layer, Selections, Load from Disk, SASH Inside.sel,
Fill with #008000...Selections None..Same Layer, Selections,
Load from Disk, BELLS.sel...Fill with JER_Gold Gradient...Same
Layer, Selections, Load from Disk, BELL LINES.sel and fill with
black...
4. Layers,
New Raster, Selections, Load from Disk, SNOUT.sel...Fill with
Black, selections, modify, contract by 2 and fill with #8C320A...Selections
None...Same Layer,Selections, Load from Disk, MOUTH.sel and fill
with Black...
5. Layers,
New Raster, Selections, Load from Disk, NOSE.sel...You can fill
it with Red to make it look like Rudolph or you can fill with
black....Your choice ! :-) Then give it an inner
bevel using the round bevel...Layers, MERGE VISIBLE !
6. Layers,
New Raster, Selections, Load from Disk, FACE.sel...Fill with
Black, modify, contract by 2 and fill with #8C320A...Go to the
Layer Palette and drag this layer below the Merged Layer...
7. Layers,
New Raster, Selections, Load from Disk, EYELIDS.sel and fill
with black..Same Layer, Selections, Load from disk, EYE Bottom.sel
and fill with Black...Selections, Load from Disk, EYE Whites.sel
and fill with White...Selections, Load from Disk, EYES Black.sel
and fill with black...Apply the Round Inner Bevel to the Eyes...Selections,
Load from disk, EYELASHES.sel and fill with Black...
8. Layers,
New Raster, Selections, Load from Disk, EARS.sel...Fill with
Black, modify, contract by 2 and fill with #8C320A...Same Layer,
Selections, Load from Disk, EARS Inner.sel and fill with Black...Layers,
MERGE VISIBLE...
9. Layers,
New Raster, Selections, Load from Disk, ANTLERS.sel...Fill with
#514031...Now go to the Layer Palette and drag this layer under
the Merged Layer...Selections All, Selections Float, Selections
Invert, Effects, Drop Shadow and use these settings...
V -5,
H 5, Opacity 63, Blur 5, Color Black...Selections,
None...Layers, MERGE VISIBLE..
10.
Layers, New Raster, Selections, Load from Disk, ORNAMENT.sel...Open
the Ornament tube and Bow you downloaded...Copy and paste the
Ornament into Selection...Layers, MERGE VISIBLE...
11.
Layers, New Raster, Selections, Load from Disk, CHEEKS.sel...
Fill with #C06514...Effects, Blur, Gaussian Blur, Radius 5...Layers,
MERGE VISIBLE...Save in PSP format or as a JPEG...
That's it,,,He
is all done !
I sure hope
you enjoyed making this reindeer and thank you for doing the
tutorial...
Kath's Tutorial Korner
© 2000 *Kath's Tuts
& Graphic Designs* All Rights Reserved
|
|