 If you need this page translated, click on the Pig
above to go to the Translator Page...
Copy and paste the url of the page and then choose
your language...
If you need this page translated, click on the Pig
above to go to the Translator Page...
Copy and paste the url of the page and then choose
your language...
Animating A Pig's
Nose
*learning how to animate
certain areas only*
This tutorial can be done with any graphic you like..
It is just to give you the basic idea !
Tutorial Written by:
Littl 1 17@ aol.com
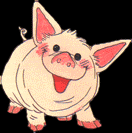
1. Open the graphic
you want to use..
I will be using the pig...lol
Hit Shift D to make a new copy and close out
the other one..
Now go to File, SAVE AS and save this first
pic as pig1..It will be saved in psp format...Remember
where you are saving your files to..You will need
to locate them in Animation Shop..
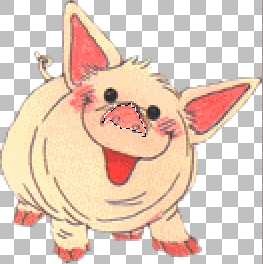
2. Choose your Freehand
Tool
and zoom in by 1 or whatever you need to see
the area you want to trace around..
Trace around the snout of the pig like illustrated
below..
 3. Now copy and paste
as new image and set
3. Now copy and paste
as new image and set
it aside for now..
4. Click Delete on
the Keyboard..Selections None..
5. Go to the image
you set aside and copy and paste
as new selection ....Place it slightly below as illustrated..
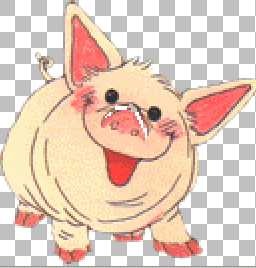
There is some white area above the nose..
Choose your Dropper Tool 
and choose the color that will blend the white
chose the light cream color of the pig and also the
reddish coloring on the nose...Then using your painbrush,,,color
it in like
below..
 6. Now go to File,
SAVE AS and save this
6. Now go to File,
SAVE AS and save this
as pig2...
7...Open Animation
Shop...
Go to File, Jasc Software Products, then
Launch Animation Shop...
8. Go to File, Animation
Wizard and just click until
you get to the Blank Window that says Add Image..
Click on Add Image and find the 2 pig files you saved..
Choose pig 2 first then pig1...then click open..
Then Next and Finish..
9. Go to View and then
Animation and you should see
the pig's snout animate...
10. Go to File, Save
As..Give your animation a name
and continue along and you have an Animation..
:-))
© 2000 *Kath's Tuts &
Graphic Designs*
Kath's Tutorial Korner